By Matthew Shaffer - Team Zoot NE

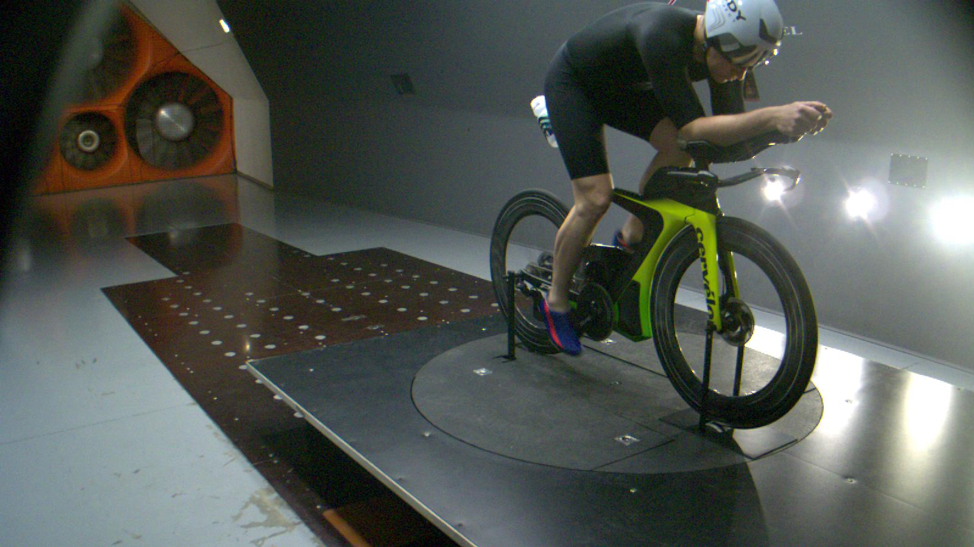
Last month, I visited the A2 Wind Tunnel in Mooresville, NC. The opportunity kind of fell into my lap after my plans to attend a training camp in early March changed due to being exposed to COVID at work (luckily, the vaccine worked and I didn’t contract it). Because I didn’t end up going to the camp, I was able to redirect those funds to an easier way to gain speed. Aerodynamics have always been really fascinating to me (which is understandable since I went to school for engineering and am now a pilot) – so this chance was really a long-time dream come true.
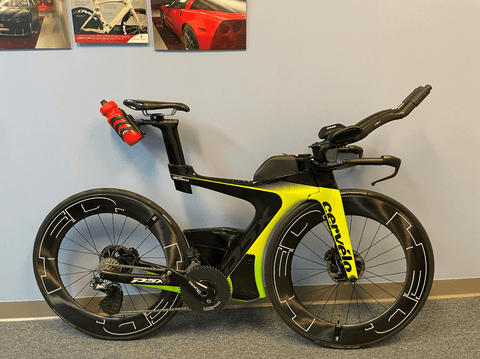
The testing session started with a bike fit with Dave Luscan, a well-known fitter in the Richmond area. I did a bike fit with Dave on my old bike a couple years back, so he was pretty familiar with my riding style. I picked up a new bike last spring (Cervelo P5X for 50% off, booya), so the first part of the fit was spent making sure my basic fit was transferred properly to the new bike. The second half, we started playing with possible position changes to test in the tunnel. The P5X has a lot of adjustability, so we played around with aerobar tilt, pad width and extension length. While we initially discussed aerobar drop, I was already riding 14 cm of drop from the pad to the saddle, which is pretty significant given my height of 5’11”. When we adjusted the drop, it ended up closing my hip angle and dropped my ability to push more power, so we opted not to test the aerodynamics of a lower position.
A side note on crank arm length/drop – a number of my Team Zoot Mid-Atlantic teammates had asked about the effects of crank arm length. Per Dave’s recommendations, I swapped from a traditional saddle and 172.5mm crank arms to a noseless saddle (ISM PN 3.0) and 162.5mm crank arms. While the shorter crank arms didn’t affect aerodynamics perse, they did allow me to ride that 14 cm of drop more comfortably and without closing my hip angle. While the ideal crank length is going to be somewhat dependent on your body type, size, and bike fit, I highly recommend people experiment with shorter lengths with the help of a qualified fitter.
With the fit session complete, I started setting up for my tunnel testing. Testing can be pretty stressful, because the clock starts from the second you step into the tunnel and doesn’t stop until you complete all your runs; and at a rate of $10/minute, time is of the essence. To minimize any delay from swapping equipment, I laid all my equipment out on the floor and set up the necessary tools to adjust position as quickly as possible.
My plans for testing were as follows:
- First, establish the fastest position, based on the variables that Dave and I setup – this first part is essential, because the position you ride in will affect how well the rest of the equipment you use tests.
- Second, with my position established, test a set of 4 helmets to test, followed by 6 tri suits.
- Lastly, with any remaining time, test two pairs of shoes and a couple different water bottle positions.
For my baseline position testing, I was riding in the Team Zoot LTD kit with a set of DIY shoes and a Rudy Project “The Wing” helmet. Every run was approximately 3-4 minutes, and consisted of a static baseline measurement, measurement at 0 degrees yaw, and 7.5 degrees yaw. Tunnel wind speed was set to 30 mph. I started out testing pad angle at 15 degrees up, which yielded a CdA of .225 (the lower the CdA, the better). We then moved the pads out wider, as the initial position was at the inner limit of what I can comfortably hold. However, widening the pads showed an increase in drag, so we moved them back in. We then dropped the pad angle to 0 degrees, then moved to 10 degrees and finally found a sweet spot of 12 degrees.
A side note on pad angle/high hands – high hands have become the “cool” thing lately, and lots of people are modeling the pros. While angling the pads for a high hands position can be more comfortable, and an extremely high position tends to test well at low yaw, it tests very poorly at 7.5-10 degrees of yaw. Given the speeds and conditions that most amateur triathletes are riding (18-26 mph), we will rarely see a true 0 degrees of yaw, so high yaw conditions are really where we can make gains. In other words – while high hands may be popular, it’s rare that it’s faster for the vast majority of people in real world conditions. This is where you start to compromise – are you going to stick with a fast, flat position you can’t hold or are you better off with a position that is slower, but you can hold for a 4+ hour bike ride? If you are unable to test, know that high hands probably won’t be faster for you – but if you can add tilt to make a position comfortable for a long race – that will likely see better gains than forcing an uncomfortable position that will have you sitting up half of the bike.

Once the position testing was over, I shifted into rapid fire mode – testing gear as quickly as possible. I rotated through 4 helmets (Rudy Project The Wing, POC Cerebel, Giro Aerohead, and Specialized S-Works McLaren). The tunnel has a massive inventory of helmets available to test, but given the experience of the testers, we narrowed the choices down to these four. I ended up being fastest in the Rudy Project (which is crazy, because their old version was flat out BAD, according to the testers).
I then started moving through suits. This definitely would have been the most comical part to watch, as I had to sprint out of the tunnel in bike shoes, change as quickly as possible, and then sprint back in (the clock is still running!!). Since I had done all my baseline testing in the Team Zoot LTD suit, I already had data on that. First up was the Zoot Ultra suit, which was my pre-test guess for fastest suit. It did test faster than the LTD – awesome! Next up was the Zoot Elite suit – which not only tested faster than the Ultra suit, but man could you feel the ventilation on the back with the Aero Mesh. I then started testing some more exotic/specialty suits – specifically the Castelli PR and the Huub Anemoi+, both of which retail around $400. Despite their high-end design, both tested slower than the Zoot Elite – awesome! I did one last test on a Louis Garneau Corsa suit, which was what I had been racing in prior to joining Team Zoot; it tested ok (better than the Huub), but didn’t touch any of the Zoot suits.
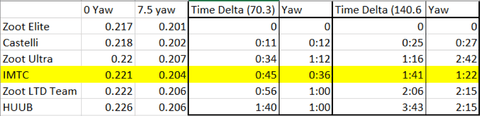
A side note on suit fit/why the Huub was slower – getting the right fit is critical to ensuring a suit tests properly. In the case of every suit except for the Huub, I was riding in a medium which fit well – tight enough through the shoulders and arms so that there were no wrinkles, but not so tight that I was distorting the pattern of the suit or cutting off circulation in my arms. In the Huub, I was riding in a small suit – which was a very, very tight squeeze. Because it was so small, I was likely decreasing the aerodynamic benefits of the various fabric patterns by overstretching them. I still don’t think that the Huub would have tested fast on me, but I don’t think it would have tested nearly as slow.
With my position dialed in and the fastest helmet and suit determined, I decided to test out some shoe options. I have two pairs of tri shoes – a pair of Bont Zero+ shoes, and a pair of DIY tri shoes. The DIY shoes are a pair of Giro Empire SLX lace-up shoes that I customized by removing the tongue, replacing the standard laces with elastic laces and making a heel pull tab that attaches to the bottom foot pad. This setup allows me to get into and out of the shoes super easy for flying mounts and dismounts. With no external straps, ratchets or dials that stick out, my DIY shoes ended up testing significantly faster than the Bonts, which are a specifically designed aero shoe. Big win for my DIY skills!
With the last ten minutes, I decided to play with bottle position. For my bike and my nutrition plan, I knew I needed at least 2 bottles, possibly 3, for a 70.3 distance. The P5x capability for mounting one behind the seat, one between the arms on the aerobars, and one on top of the storage box on the downtube. A couple of swaps found that the fastest position was 2 bottles, with the BTA bottle shifted approximately 4-5cm back, so that it extended a 3-4 cm behind my elbows. The theory there is that having the bottle slightly behind your elbows smooths the airflow coming off your arms. This setup saved 2 watts; while not a ton, it’s a measurable difference. Additionally, we found that adding a bottle on the downtube box only slowed things down by 4 watts at 0⁰ yaw and 3 watts at 7.5⁰ yaw. For a hot race, that’s only a couple of seconds, so it’s definitely worth mounting.
The results from my testing are below:
|
|
CdAPRE (estimated from previous races) |
CdAPOST (final test numbers) |
|
0⁰ Yaw |
0.2583 |
0.217 |
|
7.5⁰ Yaw |
0.2449 |
0.201 |
Based on these numbers, the time savings are:
|
|
Time Savings |
|
|
|
56 miles |
112 miles |
|
0⁰ Yaw |
6:58 |
15:38 |
|
7.5⁰ Yaw |
7:52 |
17:40 |

The first reaction I tend to get when I tell people that I went into the tunnel is “Really? Aren’t you just an amateur?” The answer is yes – absolutely, I am just an amateur. And wind tunnel testing is very expensive! But like most age-group triathletes, I’m trying to get the most out of myself in every way. When you compare the financial investment and time savings for 2 hours of wind tunnel testing (at approximately $1,200) versus a fancy new wheelset (at approximately $3k), the two options draw closer together. A new wheelset can possibly save you up to 5 minutes over an Ironman (https://flocycling.com/pages/aerodynamics). My testing found almost 17:40. Even if you cut that in half to account for popping out of position, hydration, etc., at 8:50 time savings, I get a much bigger bang for my buck compared to a wheelset.
A special thanks to Matthew Shaffer and Team Zoot captain Susan Oyler for this post. Follow Matthew on his tri journey on Instagram @ironmanshaffer
%20SPEED)